Installation How To VistA/GT.M coLinux: Difference between revisions
Added glossary link to Configuration~ |
|||
| (21 intermediate revisions by 6 users not shown) | |||
| Line 1: | Line 1: | ||
== | == Obsolete: Use [[Astronaut_Installers|Astronaut Installers]] instead. == | ||
== deprecated, at least for now, in favor of QEMU == | |||
c.f. [[Using the VistA Appliance]] | |||
[[Image:CoLinuxlogo.png|coLinux Logo]] | |||
==Quickstart coLinux== | |||
:1. The coLinux Wiki has adequate instructions. I will try to guide GT.M/VistA users to the most straight-forward route to a successful installation. There are many alternative [[configuration~|Configuration]]s possible, some more problematic than others. | |||
[[ | |||
:2. CoLinux is delivered as a self-installing executable. We can either: | |||
:a. Download coLinux-stable from sourceforge. | |||
:(The current version as of this writing is 0.6.2-linux-2.6.10 found at: http://sourceforge.net/project/shownotes.php?release_id=302431 ) | |||
:or: '''(better)''' | |||
:b. Obtain a more recent snapshot of the current testing version from the coLinux wiki itself at http://www.colinux.org/snapshots/ I am working with the snapshot of version 0.6.3-pre13. | |||
:Note: this gets us stable-coLinux-20050524.exe which produces a specially patched kernel-2.6.11. | |||
:3. The coLinux install can be anywhere on our XP machine. I have chosen to keep everything under '''C:\vfc\colinux''' . I will bold "'''C:\vfc\colinux'''" wherever a substitution should be made to use some other root directory. <br><br> | |||
:Run the colinux.exe to get this installation dialog: | |||
[[Image:CoLinux_install.jpg|left|coLinux installation wizard]] | |||
:I suggest selecting all four of these components unless this is not a virgin install. This saves some manual labor and potential confusion. <br><br> | |||
:[[Image:Destination_folder.jpg|left|C:\vfc\coLinux]]<br> | |||
:Everything goes into our chosen directory: | |||
[[Image:Root_filesystem_image.jpg||debian]] | |||
:The next decision point is whether to download a root filesystem image. <br> | |||
:I use the debian default: | |||
[[Image:Vfc_colinux_dir.jpg|frame|center|We now have ''this'' in our coLinux root/install directory: '''C:/vfc/colinux''']] | |||
: | |||
{| class="grey" border="1" cellpadding="2" |center| | |||
|- | |||
| 1. The file Debian-3.0r2.ext3-mit-backports.1gb.bz2 needs to be expanded to its full size. I installed [http://www.7-zip.org/ 7-Zip] for that purpose. The expanded Debian-3.0r2.ext3-mit-backports.1gb occupies 1,048,576 KB. I moved the bz2 to my archive directory | |||
[[Image:7-zip.png|frame|]] | |||
|- | |||
| 2. Next is a swap file. There are utilities for rolling our own detailed on the Wiki. Or just download one from: http://gniarf.nerim.net/colinux/swap/ . It will need to be expanded from its .bz2 to the correct size. | |||
[[Image:swap.png|frame|]] | |||
|- | |||
| 3. Next, we must tweak our colinux [[configuration~|Configuration]] file to match this installation. This ships as default.colinux.xml and needs to be edited, thus: | |||
|} | |||
<?xml version="1.0" encoding="UTF-8"?> | <?xml version="1.0" encoding="UTF-8"?> | ||
| Line 49: | Line 53: | ||
<network index="0" type="tap" /> | <network index="0" type="tap" /> | ||
</colinux> | </colinux> | ||
4.With this much done, we should be able to boot coLinux. | 4.With this much done, we should be able to boot coLinux. | ||
I start inside the Command Prompt because it helps with debugging. | I start inside the Command [[Prompt~|Prompt]] because it helps with debugging. | ||
We go to our colinux directory: | We go to our colinux directory: | ||
| Line 63: | Line 64: | ||
Hang on! Here comes debian! | Hang on! Here comes debian! | ||
a.Root’s password is “root” | |||
b.#df –h shows the partition /dev/codb0 is 14% used with 827Meg available. | [[Image:Console2.jpg|console window]] | ||
c.Debian linux is all there and running. | |||
d.#halt or #reboot exits the system. | a.Root’s password is “root” | ||
b.#df –h shows the partition /dev/codb0 is 14% used with 827Meg available. | |||
c.Debian linux is all there and running. | |||
d.#halt or #reboot exits the system. | |||
5.Now we can make a colinux.default.bat file to boot the system. | 5.Now we can make a colinux.default.bat file to boot the system. | ||
| Line 75: | Line 79: | ||
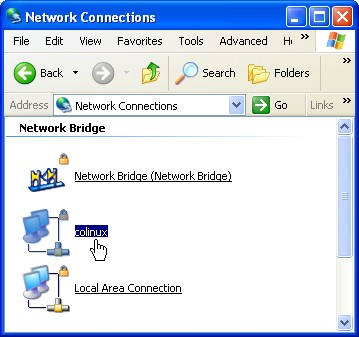
Now this is a whole special topic all its own. It is complex because the host XP operating system must own all the hardware devices. The hardware network interface is shared via a virtual connection from a phony NIC owned by coLinux. There are a couple of methods for accomplishing the link. In the end we should have a connection from within Linux that reaches the Internet via this virtual link. | Now this is a whole special topic all its own. It is complex because the host XP operating system must own all the hardware devices. The hardware network interface is shared via a virtual connection from a phony NIC owned by coLinux. There are a couple of methods for accomplishing the link. In the end we should have a connection from within Linux that reaches the Internet via this virtual link. | ||
[[Image:Bridge.jpg| | == Lots more to be added here :-) == | ||
[[Image:Bridge.jpg|bridge setup]] | |||
[[Network_configure]] | |||
[[Image:PuttyXP2.jpg|Putty into menu option EVE]] | |||
With the network interface up and running we have much nicer interface using putty. And it works from anywhere on our LAN, of course. | |||
--[[User:JohnLeoZ|gra'pa Z]] 08:36, 26 Aug 2005 (CDT) | |||
Latest revision as of 20:51, 10 October 2012
Obsolete: Use Astronaut Installers instead.
deprecated, at least for now, in favor of QEMU
c.f. Using the VistA Appliance

Quickstart coLinux
- 1. The coLinux Wiki has adequate instructions. I will try to guide GT.M/VistA users to the most straight-forward route to a successful installation. There are many alternative Configurations possible, some more problematic than others.
- 2. CoLinux is delivered as a self-installing executable. We can either:
- a. Download coLinux-stable from sourceforge.
- (The current version as of this writing is 0.6.2-linux-2.6.10 found at: http://sourceforge.net/project/shownotes.php?release_id=302431 )
- or: (better)
- b. Obtain a more recent snapshot of the current testing version from the coLinux wiki itself at http://www.colinux.org/snapshots/ I am working with the snapshot of version 0.6.3-pre13.
- Note: this gets us stable-coLinux-20050524.exe which produces a specially patched kernel-2.6.11.
- 3. The coLinux install can be anywhere on our XP machine. I have chosen to keep everything under C:\vfc\colinux . I will bold "C:\vfc\colinux" wherever a substitution should be made to use some other root directory.
- Run the colinux.exe to get this installation dialog:

- I suggest selecting all four of these components unless this is not a virgin install. This saves some manual labor and potential confusion.

C:\vfc\coLinux

- Everything goes into our chosen directory:

- The next decision point is whether to download a root filesystem image.
- I use the debian default:

1. The file Debian-3.0r2.ext3-mit-backports.1gb.bz2 needs to be expanded to its full size. I installed 7-Zip for that purpose. The expanded Debian-3.0r2.ext3-mit-backports.1gb occupies 1,048,576 KB. I moved the bz2 to my archive directory
 |
2. Next is a swap file. There are utilities for rolling our own detailed on the Wiki. Or just download one from: http://gniarf.nerim.net/colinux/swap/ . It will need to be expanded from its .bz2 to the correct size.
 |
| 3. Next, we must tweak our colinux Configuration file to match this installation. This ships as default.colinux.xml and needs to be edited, thus: |
<?xml version="1.0" encoding="UTF-8"?>
<colinux>
<block_device index="0" path="\DosDevices\c:\vfc\coLinux\Debian-3.0r2.ext3-mit-backports.1gb" enabled="true" />
<block_device index="1" path="\DosDevices\c:\vfc\coLinux\swap_512Mb" enabled="true" />
<bootparams>root=/dev/cobd0</bootparams>
<initrd path="initrd.gz" />
<image path="vmlinux" />
<memory size="64" />
<network index="0" type="tap" />
</colinux>
4.With this much done, we should be able to boot coLinux.
I start inside the Command Prompt because it helps with debugging. We go to our colinux directory:
C:\>cd c:\vfc\colinux
C:\vfc\colinux>colinux-daemon.exe –c default.colinux.xml
Hang on! Here comes debian!

a.Root’s password is “root”
b.#df –h shows the partition /dev/codb0 is 14% used with 827Meg available.
c.Debian linux is all there and running.
d.#halt or #reboot exits the system.
5.Now we can make a colinux.default.bat file to boot the system. There is an option to use an nt console: Colinux-demon.exe –c default.colinux.xml –t nt
6.Networking: Now this is a whole special topic all its own. It is complex because the host XP operating system must own all the hardware devices. The hardware network interface is shared via a virtual connection from a phony NIC owned by coLinux. There are a couple of methods for accomplishing the link. In the end we should have a connection from within Linux that reaches the Internet via this virtual link.
Lots more to be added here :-)


With the network interface up and running we have much nicer interface using putty. And it works from anywhere on our LAN, of course.
--gra'pa Z 08:36, 26 Aug 2005 (CDT)